|
The case side construction |
||
|
Click on these images for a larger image and for further details
Resumé - 13 Steps to a new method of construction!
Click on the images above for further information |
This section deals with one of the more intriguing aspects of the construction of Neapolitan harpsichords.
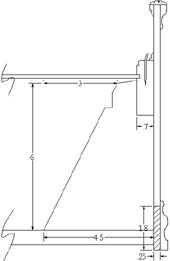
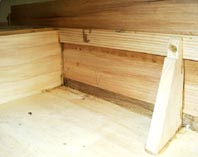
This is that the case sides and lower moulding project down below the level of the baseboard, and that there is an unusual strip, usually made of chestnut, which forms a part of the case side and is totally hidden underneath the lower outside case moulding. This strip can be seen in the drawing on the left, and more details can be found by clicking on the image of the drawing.
The fact that the joins in this chestnut strip when seen from underneath the harpsichord, are lap-jointed and not mitred like the case-side joins above the strip, and the fact that the chestnut strip was clearly not butt-glued to the rest of the top section of the case side both indicate that it must have been glued in place first and that the top part of the case with its accurate mitre joins was glued in place in a separate later operation.
After a bit of thought it occurred to us that this was a simple and clever way of facilitating the glueing of the main section of the case sides. If this lower strip of chestnut were nailed and glued in place first and then the lower outside moulding were glued to this using the lower projection of the strip to enable clamping along the lower edge of the chestnut strip, then the main upper portion of the case side could simply be slipped in behind the lower moulding. Then the only clamping that was necessary would be at the top using the soundboard liners. The lower edge of the case side would be self-clamped behind the top edge of the lower moulding and would require no clamping at all!
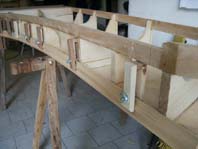
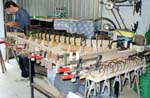
The chestnut strips were pre-bent using heat and then glued and nailed in place. The nails were positioned so that they were placed into the edge of the baseboard in the usual way. These nails provided the temporary clamping of the strip while the glue solidified and dried. The heads of the nails were driven into the wood of the strip so that they did not project up above the surface of the chestnut strips. The lower mouldings were then glued to the chestnut strips. This was done by making a large number of small clamps which were of the correct size and configuration to carry out this specific glueing job. The clamps held the lower moulding against the chestnut strips using the lower projection of the chestnut strips for clamping at the lower edge and the readily accessible upper edge at the top (see the two next to bottom photographs at the left).
The lower outer moulding is quite thick and therefore quite stiff, and even with a large number of clamps it was found difficult to bend it to the shape of the bentside where the bentside was sharply curved in the treble. The bentside lower outer moulding was therefore slightly pre-bent using heat.
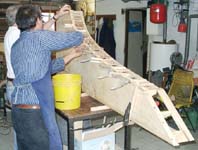
The lower moulding was then pre-clamped dry to the bentside and marked out in length for mitring. After mitring and cutting precisely to length it was glued in place using the usual hot hide glue. Although a large number of clamps was required to glue the bentside lower moulding in place it was accomplished relatively easily.
Because it was necessary to mark the bentside case side out before the tail and cheek lower mouldings were glued in place, the bentside was therefore also pre-bent, marked out to length and the end mitres were cut. The bentside was then glued in place by sliding it into the gap behind the lower case moulding and clamping it only at the top to the bentside liner. The lower edge was then entirely pre-clamped and required no clamping at all.
Once the bentside was glued in place the rest of the mouldings and case sides, all of which are straight, were then relatively easy to clamp and glue in place.
Go back to the main page of this section
|
|