The case side construction
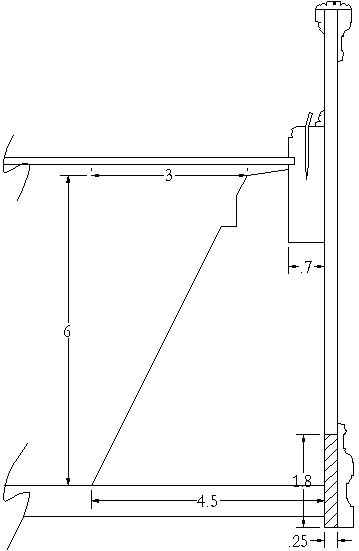
This diagram shows a schematic drawing of a section of the tail of the instruments we have constructed. As can be seen the lower part of the case side (indicated here with hatching) hidden by the lower outside moulding is separate from the main part of the case side. Also this and the lower outside moulding itself both project beyond the level of the baseboard as seen in the photograph of the projection of the case sides. Many of the Neapolitan instruments that I have seen have this feature, although it is hidden inside the instrument and is difficult to see and even more difficult to photograph. Indeed, so far I have not been able successfully to photograph this feature. However, a drawing that I made in 1974 of the anonymous harpsichord now attributed by me to Onofrio Guarracino in the Royal College of Music in London (Catalogue number 175) - see the Museum of Musical Instruments part of the Royal College of Music site - shows this characteristic very clearly. Normally this lower strip is made of chestnut wood, a cheap, hard and durable wood which, like oak and beech, is easy to bend when heated.
It is clear from many Neapolitan instruments that the lower strip of wood was not originally attached to the case side as a kind of downward extension of it. The joins in the corners of the strip are usually not mitred like the case sides but are simple overlapping joins. This shows that the strip was attached in a totally separate operation, and not when the case sides themselves were attached.
The question then arises - why make part of the case side hidden from view separate from the rest of the case side? At first I though it was a question of saving a bit of material, or the fact that it might have been difficult to find wood wide enough for the whole of the case side. However, the extra additional amount of work necessary to add this extra width to the case side negated these suggestions. Two more features of this added bit of wood were also interesting. As mentioned above it was clear that the case joins as seen at the bottom surface of the case were not the same as the case joins in the main visible part of the case. Whereas the upper part of case sides were joined with careful mitre joins, the lower strip was glued with unsophisticated overlapping joins. Also there was an abundance of glue at the join between the lower strip of wood and the main section of the case side and this glue ran down inside the lower strip in all of the instruments I have examined. This therefore indicates that the case was upright when the two pieces were glued together. In fact the two were not really properly glued together as there was often a noticeable gap between the lower strip and the main case side. Clearly the only way that this could happen is if the lower strip was glued in place in one operation and the case sides were glued in place in another.
This realisation made it clear! The lower strip was glued and nailed in place first. The lower outer moulding was glued in place next using the top edge and the lower projection below the baseboard to clamp it in place. The the top part of the case was glued in place last. Each of the case sides was slipped into the small gap between the knees and the top of the outer moulding and was held there without further clamping while the top part of the case side was clamped to the liners. Because of the short working time of hot animal glue the bentside was otherwise particularly difficult to clamp because the glue tended to congeal before the clamping of the side was completed. The lack of necessity of any clamps along one entire edge of the case side greatly reduced the time needed to place the clamps and made it easily possible to glue to the bentside within the short working time of the hot animal glue.
Go back to the main page of this section