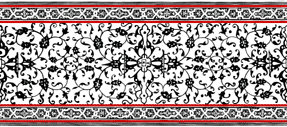
This paper exists only on the
spinett virginal of 1598 which is by either Hans Ruckers (who died in that year)
or, just at the start of his career, by Ioannes Ruckers. No other
instrument has this paper pattern. The instrument on which this pattern
occurs is in the
Musée de la Musique, Cité de la Musique, in Paris.
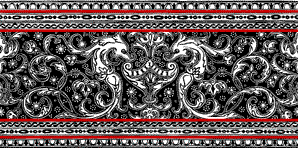
This pattern is the one used
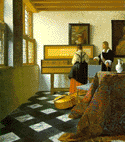
on the front flap of the serenely beautiful painting by Jan Vermeer called
'The
Music Lesson'.
This was painted by Jan
Vermeer in Delft in about 1662 and is now part of the
Royal Collection at Buckingham Palace.
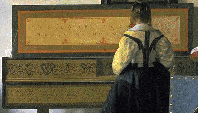
The detail above of the painting
shows the paper very clearly.
The only record I now have of this paper is a very old and rather over-exposed
negative of the photograph that I took of this paper in the 1970's. This
photograph has a scale as part of the image, so that the paper could be
accurately reproduced to its original size. There are numerous defects in
the original paper including a crack in the front flap of the Paris virginal, which has been re-glued
together with a resulting lack in the detail across the central part of the
paper. There is also a non-original lock covering over a part of the
paper. These details have been 'restored' to the best of my ability when
this block was cut.
This photograph, with all of its defects, was used to produce a digital image of
the original paper. This paper, and O'Brien Number 7, are the only ones
produced digitally. All of the other papers are reproduced from wood
blocks which I have cut by hand.
Because of various asymmetries and 'empty' sections in the paper pattern it is not
really suitable for use in the same way as the other wide paper patterns which
are often used for the keywell of a
harpsichord or virginal. But it is one of the finest in appearance when
used to decorate the inside of a virginal or harpsichord front-flap.
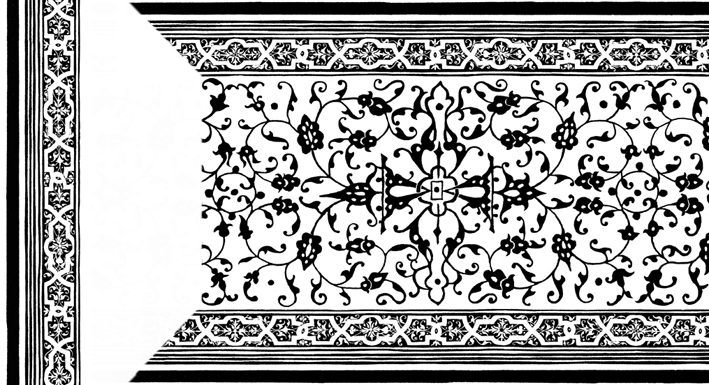
Laying the Vermeer paper
Unlike all of the other papers listed on this site, it will be noted that this
pattern includes its own integral border and does not require a separate border
pattern glued around it. This border is found only along the bottom and
top edges of the pattern as supplied and needs to be added along the right- and
left-hand edges when the whole of the final patter is glued in place.
This requires a certain amount of care and planning ahead. It is intended that
the pattern as a whole should be centred on the surface that you are covering,
usually with the join between two of the patterns at the centre of the area
covered. This means that the ends of the pattern do not coincide with the
ends of the paper pattern. Therefore the ends of the pattern will not
coincide with the ends of the area being covered by the paper pattern either.
One or two 'extra' strips of the border pattern are supplied with each order of
this paper, and these are intended to be used to fill in the border at the left-
and right-hand ends of the area being covered by this particular pattern.
In order to make the 'extra' border 'flow' around the central pattern in the
usual way, it needs to be mitred into the main central pattern. One
relatively easy way to do this is to cut the mitres in the border of the main
pattern at a point that will give the total required length - including the
width of the border pattern - for the space you are using it to fill. The
figure below shows how this could be done at the left-hand end of the pattern.
Here only the borders have been mitred at 45° at the top and bottom. Then,
before the pattern is glued in place, the border pattern is slid to the
right under the mitred corners of the main pattern until it abuts the central
part of the main pattern. Sliding the border pattern up and down will
reveal that, in a certain position, the border pattern will 'flow' around the
mitre in such a way that the pattern is more-or-less continuous across the
mitre. The degree to which the border pattern matches the existing border
pattern on the main pattern depends, of course, on where the main pattern is cut
according to the length of the area being covered. Once the best position
is found, the border can be mitred in to the main pattern and the two can then
be glued in place. Because of the length of the supplied border pattern,
one strip of border is sufficient for providing the mitred borders at both the left-
and right-hand edges of the area being covered.